基于Python实现随机图片预览
基于Python实现随机图片预览
安装flask
pip install flask
或
pip3 install flask
使用flask开发框架搭建简易随机图片api
# coding=UTF-8
from flask import Flask, send_file
import random
import os
app = Flask(__name__)
@app.route('/getRandomBingPic')
def getRandomBingPic():
lst = []
# 遍历文件夹下所有文件的绝对路径存储到列表中
for root, folders, files in os.walk('/mydata/nginx/images/'):
for file in files:
file_absolute_path = root + "/" + file
lst.append(file_absolute_path)
# 从列表中随机获取一张图片的路径
random_value = random.choice(lst)
# 预览图片
return send_file(random_value,mimetype='image/webp')
if __name__ == '__main__':
# host=内网ip
app.run(host="内网ip", port=5000, debug=True)安装gunicorn
pip install gunicorn
或
pip3 install gunicorn
使用gunicorn后台部署
gunicorn -w 4 -b 内网ip:5000 -n 进程名称 -D --access-logfile /mydata/pyScript/randomcBingPiclogs/log getRandomcBingPic:app
# -w 工作进程数量
# -b 客户端地址
# -n 进程名称
# -D 守护进程方式启动
# --access-logfile 写入日志文件路径重启gunicorn 通过
ps -ef | grep gunicorn 或 进程名称获取对应的进程id,使用命令kill -HUP 进程ID进行重启。执行上述命令后,再次执行“pstree -ap|grep gunicorn”,我们很容易发现,除了主进程,其他的Gunicorn进程都已经销毁,并新建了进程(进程ID发生了变化)。关闭gunicorn 通过
ps -ef | grep gunicorn 或 进程名称获取对应的进程id,使用命令kill -9 进程ID进行关闭
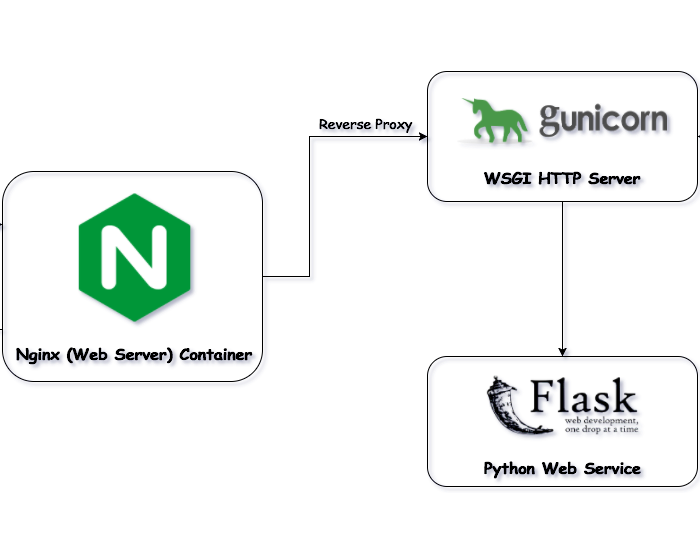
nginx添加代理转发
# 路径匹配规则
location /getRandomBingPic {
       # 代理转发url
       proxy_pass http://内网ip:5000/getRandomBingPic;
       proxy_set_header Host $host;
       proxy_set_header X-Real-IP $remote_addr;
}
前台访问

本文是原创文章,采用 CC BY-NC-ND 4.0 协议,完整转载请注明来自 zane
评论
匿名评论
隐私政策
你无需删除空行,直接评论以获取最佳展示效果
最新评论

ljh /